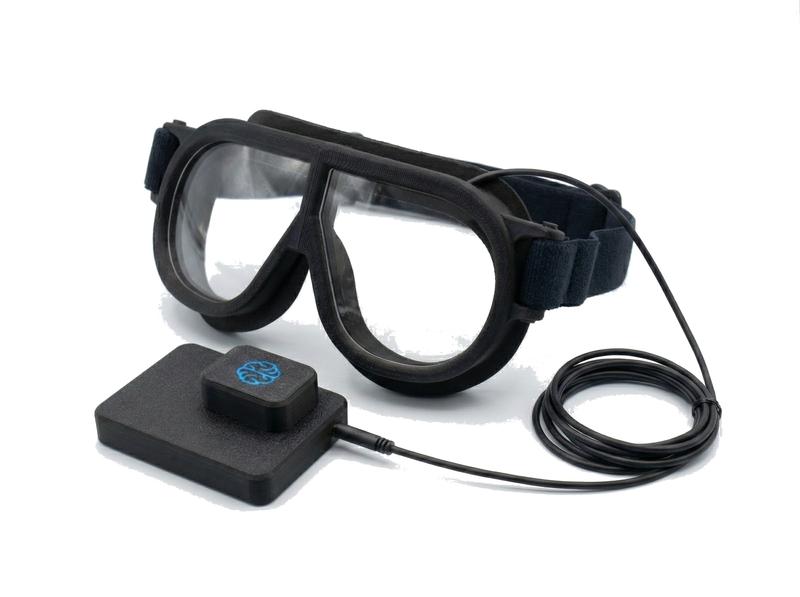
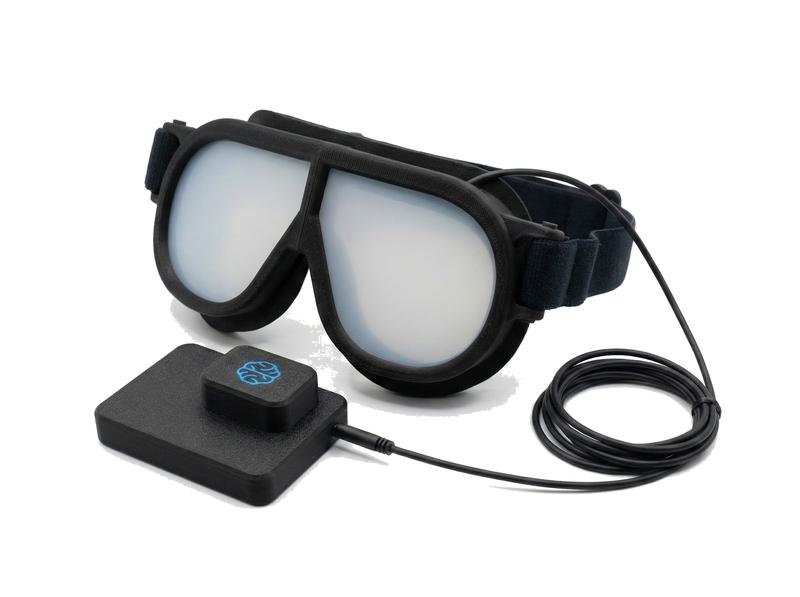
Visual Occlusion Goggles Module
Electronically controlled goggles for vision research with millisecond-precision shutter control, supporting ISO 16673 and NHTSA visual occlusion protocols.
Red Scientific Hardware
Visual Occlusion Goggles are available from Red Scientific. See our Occlusion Goggles product page for specifications and purchasing information.
Getting Started
- Connect your Visual Occlusion Goggles — USB (sVOG) or XBee dongle (wVOG)
- Enable the module — From the Modules menu
- Wait for the device tab — Indicates successful detection
- Configure and record — Set experiment type, then start recording
User Interface
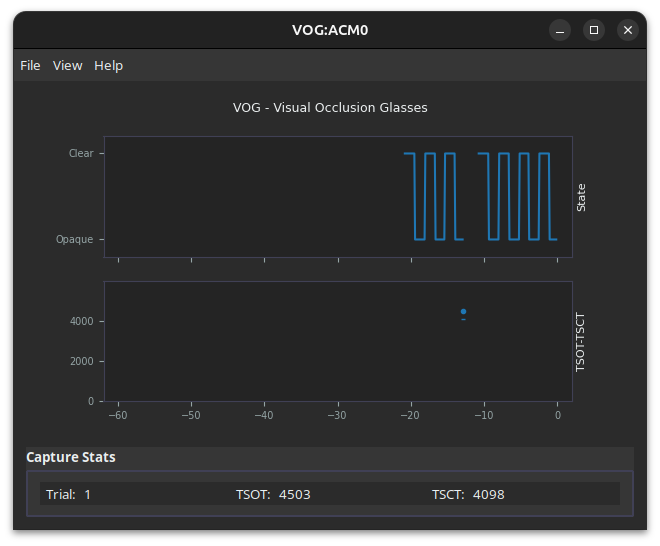
Each connected device gets its own tab with controls and real-time feedback.
| Element | Description |
|---|---|
| Real-time Chart | Shows shutter state over the last 60 seconds |
| Lens Controls | Manual open/close buttons (wVOG has independent L/R control) |
| Results Panel | Trial number, TSOT (shutter open time), TSCT (shutter closed time) |
| Configure | Opens device settings dialog |
When you start a recording session, the device enters experiment mode, the chart clears, and the trial counter resets. Each trial captures timing data for all lens state changes with timestamps synchronized to system time.
Data Output
File Location and Naming
{session_dir}/VOG/{prefix}_VOG_{port}.csvExample: 20251208_143022_VOG_ttyACM0.csv
Key Columns
| Visual demand | shutter_open (TSOT) — primary measure |
| Total task time | shutter_open + shutter_closed |
| Sync with other modules | record_time_unix |
CSV Columns
Common Columns (sVOG and wVOG)
| Column | Description |
|---|---|
trial | Trial number |
module | Always "VOG" |
device_id | Device identifier ("sVOG" or "wVOG") |
label | Trial label (may be empty) |
record_time_unix | Host timestamp (Unix seconds, microsecond precision) |
record_time_mono | Monotonic time (nanosecond precision) |
device_time_unix | Device timestamp (wVOG only) |
shutter_open | Total Shutter Open Time in ms (TSOT) |
shutter_closed | Total Shutter Closed Time in ms (TSCT) |
Additional wVOG Columns
| Column | Description |
|---|---|
shutter_total | Total cycle time (TSOT + TSCT) |
lens | Lens state (Open/Closed/Left/Right) |
battery_percent | Battery level (0-100%) |
Interpreting TSOT (Visual Demand)
TSOT measures how much time participants needed to see to complete a task:
- Lower TSOT = less visual demand (easier/more familiar task)
- Higher TSOT = more visual demand (harder/unfamiliar task)
- Approximate glances = TSOT / open_duration (typically 1500 ms)
Example values in Cycle mode (1.5s open/close periods):
| TSOT | Interpretation |
|---|---|
| 3247 ms | ~2.2 glances (ended mid-cycle) |
| 4500 ms | 3 glances (ended at cycle boundary) |
| 14832 ms | ~9.9 glances (high visual demand) |
Timing Details
Measurement Accuracy
TSOT and TSCT are measured by the device firmware (not your computer) with ±1-2 ms accuracy for both sVOG and wVOG.
PDLC Lens Transitions
| Transition | Timing |
|---|---|
| Opaque → Clear | <10 ms |
| Clear → Opaque | ~50 ms (functional), ~100 ms (full) |
"Functionally opaque" blocks enough light to prevent useful vision — this is what matters for participant behavior.
Host Timestamps
The record_time_unix column shows when your computer logged the data, not when the trial ended (typically 20-50 ms delay). This delay does not affect TSOT/TSCT accuracy. Use host timestamps only for synchronizing with other modules (video, audio, DRT, eye tracking).
DRT Integration (wVOG only)
When wVOG and wDRT share the same XBee network, the DRT CSV includes a lens column showing VOG state at each stimulus for combined visual occlusion + reaction time studies.
Experiment Types
| Mode | Button Action | Lens Behavior | Use Case |
|---|---|---|---|
| Cycle | Start/stop trial | Auto-cycle clear↔opaque | ISO 16673 / NHTSA visual demand testing |
| Peek | Request a peek | Opaque until requested | Voice/auditory interface evaluation |
| eBlindfold | End trial | Clear until pressed | Visual search time measurement |
| Direct | Control lens | Mirror button state | External equipment integration |
Cycle (Standard Visual Occlusion)
Lenses alternate between clear and opaque at fixed intervals (typically 1.5s each). Button starts/stops the trial. TSOT measures visual demand. Compliant with ISO 16673 and NHTSA Visual-Manual Distraction Test.
Best for: Measuring visual demand of in-vehicle interfaces, touchscreens, or any task requiring visual attention.
Peek (Self-Paced Visual Confirmation)
Lenses remain opaque. Participant presses button to "peek" — lenses clear briefly, then return to opaque. A lockout period prevents consecutive peeks.
Data collected: Number of peeks, cumulative peek time (TSOT), peek timing patterns.
Best for: Evaluating voice-controlled systems or auditory interfaces to measure how much visual verification users need.
eBlindfold (Visual Search Time)
Trial begins with lenses clear. Participant searches for a target, then presses the button when found. Lenses go opaque and trial ends. TSOT equals search time.
Best for: Measuring visual search performance, comparing display layouts, evaluating element discoverability.
Direct (Manual Control)
Lenses mirror button state directly. No automatic timing or trial structure.
Note
Direct mode does not calculate TSOT/TSCT. Use only when external equipment manages experiment timing.
Best for: Integration with eye trackers, simulators, or custom experiment software.
Device Types
| Feature | sVOG (USB) | wVOG (Wireless) |
|---|---|---|
| Connection | USB cable | XBee dongle |
| Timing accuracy | ±1-2 ms | ±1-2 ms |
| Power | USB powered | Battery |
| Dual lens control (L/R) | No | Yes |
| DRT integration | No | Yes |
| Battery monitoring | N/A | Yes |
Choosing a Device
- sVOG: Fixed workstation setups, simulators, simple plug-and-play
- wVOG: Mobile participants, in-vehicle studies, DRT integration, independent L/R lens control
Configuration
Click "Configure Unit" on any device tab to access settings.
| Setting | Description | Standard Value |
|---|---|---|
| Open Time | Duration lenses stay clear (ms) | 1500 ms |
| Close Time | Duration lenses stay opaque (ms) | 1500 ms |
| Debounce | Button debounce time (ms) | — |
| Opacity | Lens transparency (0-100%) | — |
Standard values (1500 ms each) implement the ISO 16673 / NHTSA visual occlusion protocol. The dialog adapts to show available options for your device type.
Troubleshooting
USB connection issues (sVOG)
- Check that the USB cable is firmly connected at both ends
- Try a different USB port on your computer
- Try a different USB cable (some are charge-only)
- Secure the USB cable — wiggling cables cause disconnects. Fix the cable and device to a rigid surface if needed.
Wireless issues (wVOG)
- Check battery level (visible in the UI when connected)
- Verify the XBee coordinator is connected to the computer
- Move closer to the coordinator if signal is weak
- Check that only one XBee coordinator is connected
Device not detected
- Verify the device is powered on (LED indicator should be lit)
- Check that the VOG module is enabled in the Modules menu
- Check that your OS recognizes the device:
- Windows: Check Device Manager > Ports (COM & LPT)
- macOS: Check System Information > USB
- Linux: Run
lsusbto list USB devices
- Check the log panel for connection errors
- Restart the module from the Modules menu
Lenses not responding
- Check that the device tab is visible (indicates connection)
- Try Configure > Refresh to reload device state
- For wVOG: check battery level
- Reconnect the USB cable or restart the wireless device
No data after trial
- Verify recording was started before beginning the trial
- Check that a session directory was selected and is writable
- Check the log panel for file write errors